Help
1. Download and try
Click Download and try free. Drag Mole into Applications and launch it. Each paid tool works twice without a license.
2. Buy a license
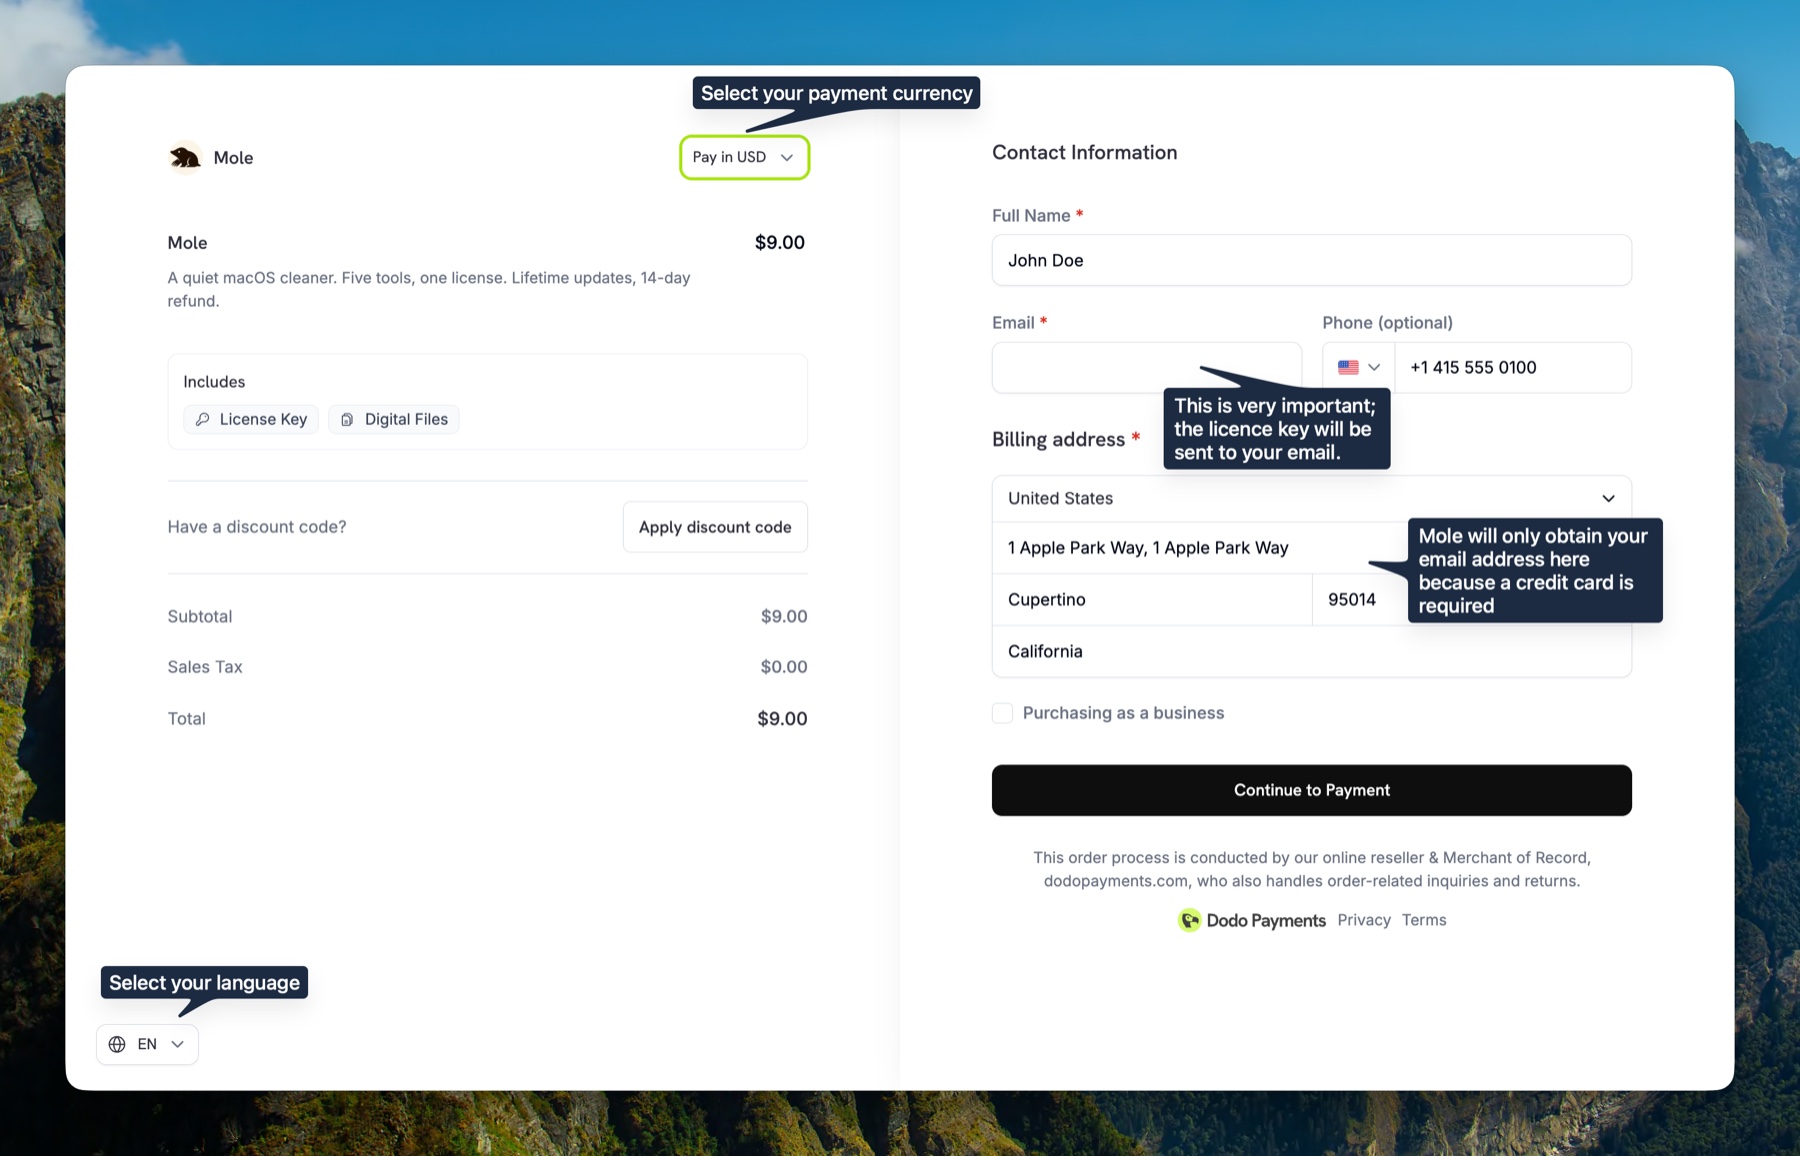
From the homepage, click the buy button. You will land on the secure Dodo Payments checkout page.
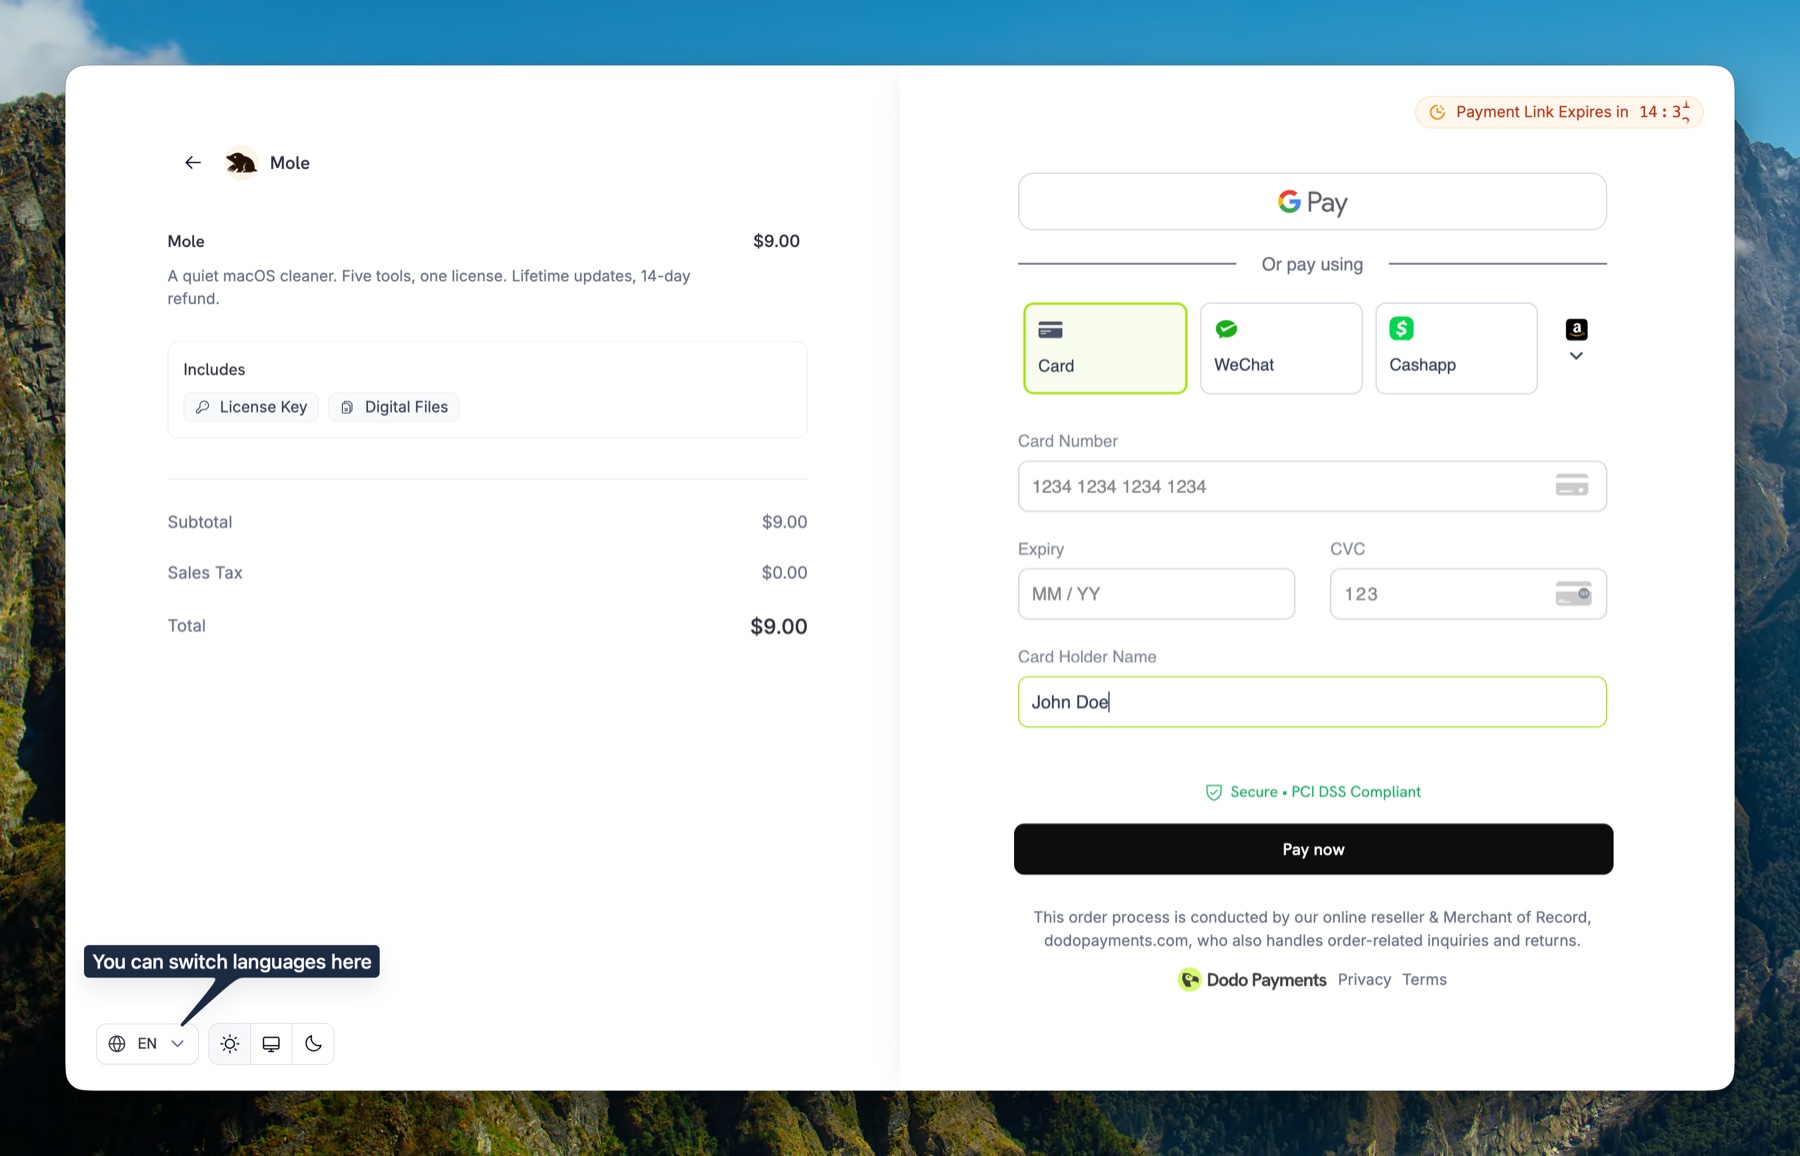
How can users in mainland China pay with WeChat? On the checkout page, confirm that the currency is Chinese yuan (CNY), switch to it if needed, and check that the language selector below is set to Chinese. Enter your contact details and billing address, then continue to the second page to choose WeChat Pay. Your license key will be sent to the email address you enter at checkout.
- Fill in Contact Information: your name, an everyday email address, and a phone number. The license key is sent there, so double-check the spelling before paying. Apple iCloud addresses (
@icloud.com,@me.com,@mac.com) and privacy relay or forwarding addresses (such as@duck.com) often filter or silently drop these emails; a Gmail or Outlook inbox is the most reliable. - Fill in Billing Address: country, city, region, postal code.
- Click Continue to Payment.
- Pick a payment method: Card, Apple Pay, Google Pay, WeChat, or Cash App.
- Confirm payment. The license key is emailed once payment is confirmed; some payment methods take longer.
3. Activate Mole
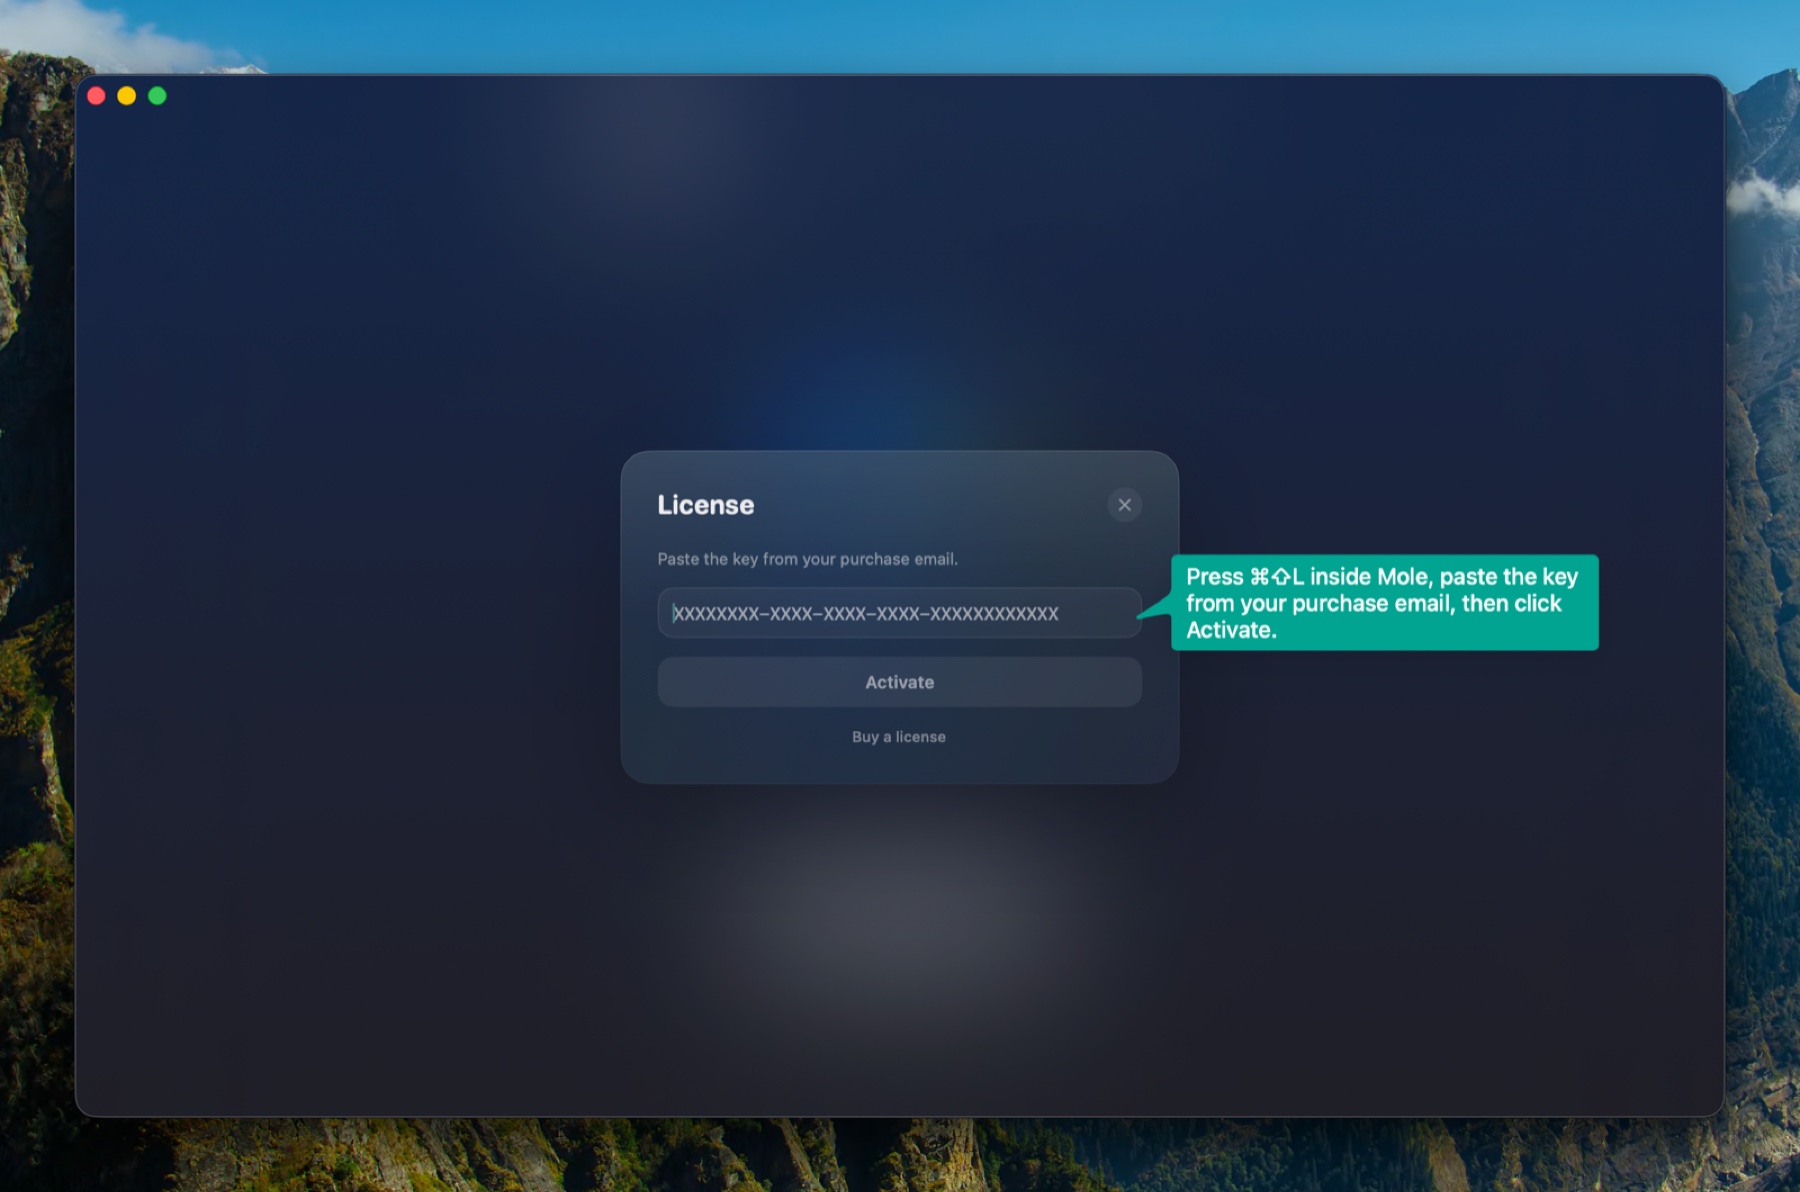
- Open the email from Dodo Payments and copy the license key.
- Open Mole. Press
Cmd + Shift + L(or open the Mole menu in macOS's menu bar and choose License…). - Paste the key and click Activate. Mole removes accidental spaces and line breaks automatically.
- You will see All tools unlocked. That is it.
Activation says "Network error"
Activation talks to Dodo Payments over HTTPS. Some VPNs, proxies, DNS filters, or split-routing rules can block that request, especially when the route exits through an unstable node. If the message keeps appearing, turn off VPN/proxy or switch briefly to a phone hotspot or direct connection, then click Activate again. Mole only sends the license key and a short device label for activation.
The license email didn't arrive
It usually arrives shortly after payment is confirmed. If you don't see it, check your Junk or Spam folder and search the mailbox for Dodo. Apple iCloud addresses (@icloud.com, @me.com, @mac.com) and relay addresses sometimes block it outright. If nothing shows up after a few minutes, email hi@mole.fit with your Payment ID or purchase email and I will resend the key, or send it to a different inbox.
You can also use the Dodo Payments Customer Portal. Enter the email used at checkout, open the one-time login link Dodo sends, then view the order, download the invoice, and find the Mole license key tied to that purchase.
4. Switch to a new Mac
The number of Macs you can use at the same time depends on the edition you purchased. The edition currently on sale covers 2 Macs. For more Macs, buy additional licenses; each key keeps its own device list. To move it: open Mole on the old machine, press Cmd + Shift + L, click Deactivate. Then activate on the new machine with the same key. If that Mac is gone, sold, or already wiped, you can deactivate it yourself from the Dodo Payments Customer Portal above, without needing the machine.
5. Refund and invoices
If Mole is not what you wanted, email hi@mole.fit within 14 days with your Payment ID or purchase email. See the Refund Policy for full terms.
Please include a short note in the email about what felt difficult or did not meet expectations. It helps me process the request faster and keep improving Mole.
Dodo Payments generates a receipt automatically after each purchase. For a formal invoice (with a company name or VAT info), email hi@mole.fit within 30 days of purchase.
6. Settings and shortcuts · Preview
Press Cmd + , to open Settings. Settings has three tabs. The defaults are tuned to work out of the box, and most people only ever touch language, shortcuts, and the menu bar. Everything is listed below by tab; section 7 covers how to choose.
General covers the basics:
- Language sets the interface language after a relaunch.
- License shows activation status and lets you activate, deactivate, switch devices, or recover from a device-limit state.
- Full Disk Access shows permission status and opens the right System Settings pane.
- Cache Removal decides how caches are handled: Permanent deletes caches without using the Trash, while Trash allows recovery until emptied.
- Protected Items lists the folders you marked yourself, and every future scan skips them. Nothing is added from here: you add an item during a clean review with Never Clean This, or a whole category with Never Clean Any “X” Folders, and this pane only shows and removes what you added. Mole's built-in protection is separate, never appears in this list, and cannot be turned off.
- Show AI cleanup & maintenance shows the Moon entry when AI tool data is found; enabled by default.
- Remove data and settings with apps starts eligible app-data rows checked as well as caches; off by default, with shared data and protected profiles still requiring their existing review.
- Quick uninstall keeps a successful uninstall in the app list with a brief footer summary; off by default, and incomplete outcomes still open the result page.
Tools covers Keep Screen On, Clean Screen, battery and fans:
- Clean Screen Input Protection uses the macOS Accessibility permission to block input during a Clean Screen session; the toggle links to that permission pane. This is the control-your-Mac permission, not the screen-reader support covered in section 8.
- End fan boost after cooling returns control to macOS after temperature and load settle; on by default.
Menu Bar controls the menu bar HUD and its quick tools:
- Launch at Login starts Mole automatically when you log in.
- Menu Bar Icon keeps live metrics, a compact icon, or a moving runner in the macOS menu bar.
- Menu Bar Only keeps Mole in the menu bar while it runs in the background; the Dock icon still appears while the window is open.
- Runner style picks the character, including Mole, RunCat, Beagle, Poodle, Dinosaur, Horse, Rabbit, Frog, Chicken, Rubber Duck, Fishman, Pixel, Flex, or a static silhouette. They face left by default, and Flip direction turns them to the right.
- Visible metrics sets two menu bar metrics, each picking one of CPU, Memory, Pressure, Swap, GPU, Disk, Temperature, Battery, Power, Fan, and Devices. The two metrics cannot carry the same metric, so picking one twice switches the other metric to Memory (or CPU), and the last visible one cannot be turned off or the menu bar would be empty. Macs with no built-in battery do not offer Battery.
- Layout puts the two metrics side by side with a small label over each value, which is the default, or stacks them in two lines.
- Network Speed is its own switch, adding a column of upload and download speed beside those two metrics rather than taking either slot.
- The Open Mole shortcut is in Settings › Menu Bar; Keep Screen On and Clean Screen shortcuts are in Settings › Tools. Open Mole defaults to
⌃⌥⌘M; the other two are unassigned on a fresh install. - Privacy alerts tell you when the camera or microphone starts being used. Hover over an alert and choose Stop notifying for this app; manage the list later under Settings › Menu Bar. The action appears only when macOS identifies the app.
Shortcuts:
Cmd + ,open SettingsCmd + Shift + Lopen License panelEscclose any overlay (Settings, License, Doctor, review panels)- The Open Mole shortcut is in Settings › Menu Bar; Keep Screen On and Clean Screen shortcuts are in Settings › Tools.
7. Tips for daily use
The earlier sections cover setup and operation. These notes help you fit Mole into how you actually work.
Menu bar shortcuts
The Open Mole shortcut is in Settings › Menu Bar; Keep Screen On and Clean Screen shortcuts are in Settings › Tools. Open Mole defaults to ⌃⌥⌘M; the other two are unassigned on a fresh install. Click into a field, press the combination, then press Enter; Mole replaces any previous binding for that action.
Picks that work well: ⌘⇧O for Open Mole to peek at CPU and memory in passing; a function key or ⌥⇧K for Keep Screen On while presenting or downloading; ⌃⌥C for Clean Screen before wiping the display and keyboard, especially with input lock enabled.
Reading the two menu bar lines
CPU is every core added together, and on Apple Silicon the efficiency cores count alongside the performance ones, so background indexing, a backup, or a download will lift the number even though nothing is struggling. Brief spikes are normal. Mole starts deducting from the health score at 50% and treats 85% as genuinely high, but the reading worth investigating is one that never falls back, which usually means a process is stuck in a loop; open the menu bar panel to see the five processes using the most CPU.
Memory shows how much is in use, which is not what Mole judges memory health on. It reads pressure instead, because macOS deliberately spends idle memory on cache, so full is the system working rather than the system running out. Put Pressure on one of the lines to watch that signal directly, and Swap is worth a look too: only steady growth there means memory is actually short.
Disk is the startup volume, where Mole starts deducting at 80% and calls 93% tight, because macOS still needs headroom for swap files and local snapshots. Temperature, Fan, and Devices depend on what the machine and the connected hardware report, and a reading that cannot be taken shows no number.
When to touch the fans
Supported Macs offer Auto, Cool, and Max, and Auto is the default, meaning macOS handles it. The system already balances noise, power, and temperature, so there is normally nothing to do here. The one case worth overriding is when you already know a long stretch of heavy work is coming and would rather spin the fans up in advance than have them catching up after the heat arrives.
Cool starts the fans at about half speed and speeds them up as the CPU gets hotter, and Max runs them flat out. By default both return to Auto once CPU temperature and load have stayed low for a few minutes; to keep them until you switch back yourself, turn off End fan boost after cooling in Settings › Tools. Quitting Mole always hands control back to the system. The first switch needs one administrator authorization and never asks again. After sleep or a system update macOS may reclaim the fans, and Mole says it is back on Auto rather than pretending the preset still applies.
Optimize cadence
Optimize starts with a visible fix pass for input-method switching, Spotlight, Notification Center, and Universal Clipboard, then runs deeper maintenance. It skips a task when its own check says it is not needed, such as the memory purge while memory pressure is healthy or the Mail and Messages database compaction while those apps are open, and every skipped task carries its reason in the result list.
Suggested rhythm: run Optimize when memory pressure stays high or apps open slowly, not as a daily habit. Between Optimize runs, running Doctor from the Mole logo menu is a lighter health checkpoint.
Cache removal mode
Permanent (the default) deletes caches without using the Trash and deleted files cannot be restored from the Trash. Trash moves eligible caches to the macOS Trash, so you can drag items back to the original location while they remain there.
Trash mode is a way to recover deleted items for the first few cleanups, or whenever a category is unfamiliar. Open Docs › Clean to see which sections are auto-clean and which are review-only.
Why Mole leaves some things alone
Mole would rather miss something than remove the wrong thing, so three kinds of item are listed for you but never checked on your behalf. Caches belonging to a running app come first: clearing a browser's cache while it is open can break the current session, so Mole skips it. Next is anything a reinstall cannot rebuild, since a cache comes back by itself while chat history, project files, and license data do not, which is why those rows start unchecked during an uninstall and wait for you to look. Last is territory the system manages itself, where input methods, Notification Center, login items, and audio drivers are expensive to break and release very little space.
Before anything is removed you get the full list and the byte count, and afterwards it goes into ~/Library/Logs/mole/operations.log, the same log Doctor reads. When you are sure you never want to see an item again, choose Never Clean This during the review and it joins the Protected Items list from section 6.
8. VoiceOver and keyboard
Mole is meant to be driven by VoiceOver and by the keyboard alone. Most of the rules below exist because a blind user wrote in about a screen that read wrong, and each one is held in place by a test that fails the build if it comes back.
- Name first. A row announces what it is before its numbers: an app before its size, a file before its date, a tab before its state. Size, counts, and actions never come first.
- State is state. Selection is announced as a state rather than written into the name, so a list does not read as "selected, selected, selected".
- Everything is reachable. Tab reaches every tab and every primary action, arrow keys move across the five tabs, and Space or Return activates. Keyboard focus always has a visible mark.
- Overlays behave. Opening Settings, License, or Doctor moves VoiceOver focus into the panel once it has settled; Escape closes it once and returns focus where you left it.
- The menu bar is reachable. VoiceOver can read and activate the menu bar icon, including while it is showing a runner.
- No empty stops. Decorative dots and dividers are skipped, so navigation does not land on things with nothing to say.
One deliberate limit: the treemap in Analyze is a picture of relative size, and exposing it shape by shape would read as a few hundred unnamed rectangles. It is hidden from VoiceOver on purpose, and the Largest items list beside it carries the same data in a form you can move through.
Before a release the five tabs and every overlay are walked once with VoiceOver and once with the keyboard alone, and the screenshots are checked again in grayscale so that no state depends on colour to be understood.
If a screen still reads wrong, write to hi@mole.fit with the screen and what you heard. That is where these rules came from.
9. Run Doctor inside Mole
Click the Mole logo in the top-left of the window and pick Run Doctor. Mole gathers a short read-only report covering your Mac, permissions, recent operations, and environment. Click Copy Report and paste it into your message to support.
Full Disk Access is missing
Mole needs Full Disk Access to scan caches under ~/Library and system locations. Open System Settings › Privacy & Security › Full Disk Access, enable Mole, and relaunch the app. Scanning reads files locally; Mole does not upload their contents.
Memory pressure is high
macOS reports elevated memory pressure when active memory plus compressed memory crowd out the cache. Close unused apps (especially browsers with many tabs and large Electron tools). Mole's Status tab lists the top processes by CPU and memory if you want to see who is using the most.
Disk is almost full
Mole flags startup disk usage above 90%. Low free space can affect performance, but this threshold does not mean macOS has started swapping. Open Clean to review caches, logs, and Trash, or use Analyze to find large folders.
Restart recommended
Your Mac has been running for several days and a macOS process such as fseventsd or syspolicyd is using a lot of CPU. Mole does not force-quit system processes. Save your work, restart, and check whether CPU usage returns to normal.
Battery health is low
Mole flags this when maximum capacity drops below 80% or the battery passes 1000 charge cycles. There is no software fix for a worn battery: check the exact reading under System Settings › Battery › Battery Health, then book Apple service if runtime no longer holds up. The Status tab keeps the same reading visible.
Mole's operations log can't be written
Mole records operations in ~/Library/Logs/mole/operations.log. A full disk or missing write permission can prevent this. Check free space and the folder’s write permissions, then reopen Mole and run Doctor again to see whether the warning remains.
Recent operations failed
A failure usually means one path inside a clean or uninstall batch was protected by macOS, blocked by another app, or already gone by the time Mole reached it. Open the tab where the failure happened (Clean, Software, Optimize) and inspect the details overlay; each failed row carries a reason.
10. Report a problem
Before filing anything, check open issues first; someone may have hit the same thing.
- Mac app bug or crash
- Run Doctor first (section 9 above), click Copy Report, and email the report to hi@mole.fit.
- Mole is frozen or keeps spinning
- Do not force quit yet. Email your Mole version, macOS version, and the steps that led to the freeze to hi@mole.fit. If more evidence is needed, support will send you a diagnostic command to copy and run.
- Mac app feature idea
- Open the feature request form. Describe the problem the feature would solve, not just the feature itself.
- CLI bug or suggestion
- The Mole CLI is a separate open-source project. File CLI-specific issues in the CLI issue tracker. Include your macOS version and
mo versionoutput. - License, payment, refund, or private details
- Email hi@mole.fit with your purchase email, Payment ID, and approximate payment time.